In my former life, I went to Japan a bunch of times, and I always enjoyed eating there. I can't wait to go back there. In supermarkets, you can easily…]]>
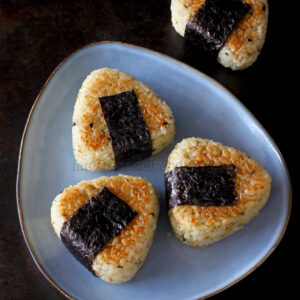
Yaki Onigiri with spicy tuna
In my former life, I went to Japan a bunch of times, and I always enjoyed eating there. I can't wait to go back there. In supermarkets, you can easily find onigiri, these rice triangles, filled with cooked tuna, cooked salmon, or a salted plum, but which can also take other shapes (dumplings, rectangles etc.). As soon as they are grilled (usually on a small grill), they are yaki onigiri (yaki = grilled). Here, I make them in a pan and I also put furikake, a condiment that gives a delicious taste to the rice. I enjoyed this recipe which is much easier to make than it seems!
Ingrédients
For Onigiri
- 330 g Sushi rice
- 415 g waterafter cooking furikake
Sushi vinegar :
- 50 g sugar
- 10 ml mirin
- 70 ml rice vinegar
- 5 g salt
For the spicy tuna:
- 55 g mayonnaise
- 10 g sriracha
- 140 g canned tuna (drained net weight)
For cooking and tasting:
- 1 teaspoon cooking oil
- clear soy sauce to devour
Instructions
Start by washing the sushi rice.
- Rinse and drain. Put it in a rice cooker or saucepan.
- Pour in the water (415g) and turn on.
- Meanwhile, mix sugar, mirin, vinegar and salt in a bowl.
- When the rice is cooked, unplug the rice cooker without the lid. Let it cool a little and then pour it into a container. Pour in the vinegar sauce gradually. Don’t put everything! Mix without crushing the grains of rice, you must be very careful.
- I put in about 3/4 of the sauce and save the rest for another time. But if you prefer more vinegar, then add more!
- This is furikake, a Japanese condiment for rice. You can find it in Japanese grocery stores, in more general Asian grocery stores and also online. There are a lot of different kinds.
- I season the rice with a good tablespoon. Mix carefully.
- Prepare the tuna. Flake the 140g of drained tuna with a fork.
- Here is the Japanese mayonnaise, but feel free to use another mayonnaise. The red pot is the sriracha sauce.
- Add the sauces and mix well.
- Here is the small onigiri mold. You can do without it and do it all by hand, but it’s still much more convenient with it! I bought the best one at Kioko in Paris, but you can find it online.
- Put a first layer of rice making a kind of cavity.
- With about 20g of tuna per onigiri.
- Replace with rice. There should be at least 6mm of rice on top of the tuna.
- Put on the small lid, press, then carefully remove from the pan.
- Heat a frying pan with a little oil (not too much because the rice may fall apart…) then grill the onigiri until they have an amber color.
- Brush both sides with clear soy sauce, then apply a sheet of seaweed cut to size.
- All that’s left to do is to enjoy it with soy sauce!
Nutrition
Calories: 108kcalCarbohydrates: 12gProtéines: 3gFat: 5gLipides saturés: 1gGraisses polyinsaturées: 3gGraisses monoinsaturées: 1gLipides trans: 0.01gCholéstérol: 7mgSodium: 295mgPotassium: 31mgFibre: 0.3gSucre: 5gVitamine A: 13IUVitamine C: 1mgCalcium: 4mgFer: 0.3mg
Vous avez essayé cette recette ?Let us know how it was!
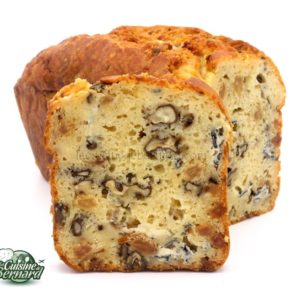
Blue raisin and walnut cake
This recipe is one of the unpublished ones in my books. But I really wanted to share with you this delight from my third book "I'll take a bite out of it". We all make savory cakes and I have several attempts at the time to get the proportions I like for a fluffy batter, but where the ingredients don't fall to the bottom of the pan. I suggest this super-delicious version with blue cheese (I used Saint Agur here), nuts and raisins. You can vary by adding cranberries, dates and other nuts!
Ingrédients
- 300 g flour
- 1 bag of baking powder
- 1 g whole milk
- 3 eggs of 60g each (180g in total)
- 120 g rapeseed oil (make sure it is also for cooking)
- 120 g grated cheese
- 15 g sugar
- 5 g salt
- pepper
Instructions
- Place the flour, yeast, milk, eggs and oil in a large bowl.
- Mix with a whisk and add salt, sugar and grated cheese. Add pepper to taste.
- Cut the Saint Agur or Fourme cheese into pieces.
- Add to the dough with the raisins and walnut pieces.
- Mix well.
- Pour into the cake tin lined with baking paper.
- Bake at 175°C for 45-50 minutes, adapting the baking time to your own oven.
- I made another version with pecans and a mixture of cranberries and raisins. Try it with dates, it's a treat too!!!
- Same principle and same cooking !
- This cake is delicious cold or just warm.
Nutrition
Calories: 2734kcalCarbohydrates: 179gProtéines: 77gFat: 190gLipides saturés: 43gGraisses polyinsaturées: 95gGraisses monoinsaturées: 37gLipides trans: 0.1gCholéstérol: 596mgSodium: 6546mgPotassium: 780mgFibre: 11gSucre: 27gVitamine A: 1758IUCalcium: 1638mgFer: 14mg
Vous avez essayé cette recette ?Let us know how it was!
Flaky bread
I have been fascinated by foliage for many years (for as long as I can remember) and it is with a thirst for learning that I have taken advantage of my travels to discover the different styles of foliage in the world. I was introduced to flaky bread not too long ago, especially from the bakery “La Parisienne”. A must of the genre. I wanted to replicate the same bread shape and crispness. It is finally like a kouign amann without sugar and the different methods I learned before clearly helped me to make this bread. A delight that I will be making regularly…
Ingrédients
- 500 g flour T55
- 5 g dry baker's yeast
- 8 g salt
- 355 g cold water
- 300 g dry butter (or Charente Poitou PDO butter with at least 82% fat content)
Instructions
- Pour the flour, salt and yeast into the bowl of a food processor. Put the salt on one side and the yeast on the other, so they don't touch.
- Pour the water in one go.
- With the hook, knead for about ten minutes at medium speed at first.
- As soon as the water and flour have combined, knead at high speed. You can stop, when the dough comes off the wall of the bowl. It is very soft and elastic. This is quite normal! No worries. At the beginning the dough is very wet and as you knead it, the yeast becomes active. The dough will increasingly come off the wall of the bowl and "slam". I stop kneading when it almost lifts off the bottom with the hook.
- If you touch it with your fingers, it sticks a lot. But everything is under control!
- Bring it back in a ball. For this, I use a plastic horn (you can use a maryse).
- Put a tea towel over the bowl (not in contact with the dough) and let rise for 1h30. It must be swelling well!
- Press the dough to remove the gas from it. Then put cling film on top of the dough and chill overnight. The dough will slowly swell in the cooler and develop the flavors.The next day, take out the dry butter (also called dry butter or tourage butter) 15 minutes before the dough. Tap the cold butter with a roller to soften it while keeping it fresh (the cold, not the expiration date! ????). Try to type on it as best you can, making it a square shape of about 20cm on each side. Finally, pour the cold dough onto the floured work surface.
- Roll out the dough into a square shape larger than the butter. By placing the butter as shown in the photo below, you should be able to close the dough around it so that the joints fit perfectly.
- Close the dough perfectly around the butter. Then roll out the dough into a long rectangle. Roll out the dough lengthwise only, not widthwise. Try to be as regular as possible.
- My photo is badly taken because I turned the dough (and I didn't think I would get it right the first time, so I didn't take all the photos). But read my instructions carefully. Fold over a small piece of the top edge. Join the bottom edge so that the seam is perfect.
- This time fold it in half to make a first double turn. Turn the dough 90° and roll out into a long rectangle. Make a second double turn. Cover the dough with cling film and let it rest in a cool place for 30 minutes. Finally, roll out into a square of about 40cm on each side. Try to be as regular as possible. You can roll out the dough obviously in one direction and in the other to have this square.
- Wet the dough with a little water on the surface, then remove the excess with a paper towel. The dough should be just sticky on the surface, a bit like the dough for my pastéis de nata (see recipe HERE).
- Then roll the dough into a tight ball.
- Trim both ends (you can discard them), then cut the sausage into three equal parts.
- I don't bake 3 loaves of bread at the same time, because I use my steam combi oven for that, which is smaller than the other conventional home oven. If you bake in an oven that takes 30 x 40 cm trays (classic version), you can place the 3 loaves.
- Let the breads grow for 1 hour at room temperature.
- Before baking, cut the bread with a razor blade or an excellent knife.
- For cooking.So I've never hidden it, KitchenAid is a partner of the workshop. The steam oven installed in it has a special function for bread. The result is amazing. The crust is perfect. I bake it at 230°C for 30 minutes and put it in the oven when cold with the dedicated function. But without this oven, it is still possible to bake bread. Phew! Preheat the oven to 220°C (the temperature is not the same as with the steam oven). if you have a pizza stone, take advantage of it!Bring a small pot of water to a boil. Pour the boiling water into a dish or tray in the bottom of your oven. The goal is to have water vapor.To slide the bread onto the baking sheet, place it on parchment paper and slide it onto the stone.Some butter will come out during the cooking process, this is quite normal. A delicious smell will fill your kitchen too!
- The bread is delicious as is, still warm or with a little honey or jam.
Nutrition
Portion: 3puff pasry loaves of 250gCalories: 1232kcalCarbohydrates: 83gProtéines: 15gFat: 95gLipides saturés: 56gGraisses polyinsaturées: 7gGraisses monoinsaturées: 24gLipides trans: 3gCholéstérol: 215mgSodium: 2910mgPotassium: 248mgFibre: 6gSucre: 6gVitamine A: 2499IUVitamine C: 0.003mgCalcium: 272mgFer: 6mg
Vous avez essayé cette recette ?Let us know how it was!

Gingerbread to spread
I love gingerbread and I’ve been thinking about the spreadable, cookie cutter version for a long time. I made several attempts at proportions and baking to get a gingerbread that I really like. It contains a lot of good things: honey, candied orange, candied lemon, chopped almonds, spices, and it will keep for a long time. The only problem with the recipe is that the gingerbread is only good for 3-4 days after baking! This is often the case for all gingerbread. I also introduce you to a particular ingredient: potash. It is really the leavening agent used in this style of cake. Potash can be found on the internet (I’ll give you the link to the store where I bought it), but can be replaced at worst by sodium bicarbonate!
Ingrédients
- 400 g honey
- 200 g brown sugar
- 1 good pinch salt
- 650 g flour
- 300 g chopped almonds
- 2 tablespoons cinnamon powder
- 1 teaspoon ginger powder
- 1/2 teaspoon 4 spices mix
- 10 g potash diluted in 15ml of water
- 140 g candied orange peel
- 140 g candied lemon peel
- the zest of half an organic lemon
- 30 ml water
Icing
- 300 g powdered sugar
- 75 ml water
Instructions
- Pour the honey, sugar and salt into a saucepan over low heat.
- Mix while bringing to a simmer. When the first bubbles appear, set aside.
- Pour the flour and chopped almonds into a bowl or the bowl of your food processor.
- Chop the candied orange and lemon peels into smaller pieces. You can find them on the internet or even in the pastry section of the supermarket (even Vahiné in fact).
- Pour over almonds.
- Add the spices: cinnamon, ginger, 4 spices.
- Here is the ingredient of the day : potash ! It is really the leavening agent used in gingerbread from the East and Germany. I bought it on a vegan website. I put the link HERE!
- Pour 10g into a small container and add the 15ml of water. Mix until completely dissolved.
- Pour the zest of half an organic lemon into the flour.
- And diluted potash.
- Mix well and then pour the contents of the pan.
- Mix carefully.
- Add the 30ml of water.
- Knead until you have a dense and homogeneous dough.
- At this stage, the dough does not smell good, this is due to the potash. But as it cooks, it disappears completely. The advantage of potash is that it makes the dough rise in a very different way than baking powder or sodium bicarbonate. The dough tends to grow on the sides and not upwards. You can still replace the potash with more traditional baking soda. but the growth is not quite the same.
- In many recipes, you are told to let the dough rest for 24 hours under cling film. I have obviously made several attempts, and it does not change anything. Roll out the dough on a paper or floured surface (which I ended up preferring!).
- The dough should be at least 8mm thick.
- Cut the gingerbread with a cookie cutter.
- All forms are possible.
- Place on a baking sheet lined with parchment paper.
- Bake at 160°C (still on fan heat with me!) for 20-22 minutes, watching. The gingerbread will puff up nicely, but not high. They should still be tender in the center, but cooked through and pushed. If you overcook them, the risk is that they will be hard. But usually, 3 days later, they get a little tender.
- Let gingerbread cool before icing.For the icing, mix the water and powdered sugar.
- For larger sizes, pour and spread with your hands or a spoon.
- Otherwise I prefer this method: dip the upside down cookie.
- Then remove the excess.
- Let drain on a rack. The glaze will air dry. You can also return to the oven at 90°C for 7 minutes.
- The glaze should be soft and dry to the touch.
- Now be patient: the gingerbread will be a thousand times better 3 days later! The fragrances are developing.
Nutrition
Calories: 5255kcalCarbohydrates: 1073gProtéines: 123gFat: 207gLipides saturés: 33gGraisses polyinsaturées: 52gGraisses monoinsaturées: 106gLipides trans: 0.4gSodium: 5666mgPotassium: 4499mgFibre: 81gSucre: 389gVitamine A: 302IUVitamine C: 253mgCalcium: 2169mgFer: 39mg
Vous avez essayé cette recette ?Let us know how it was!
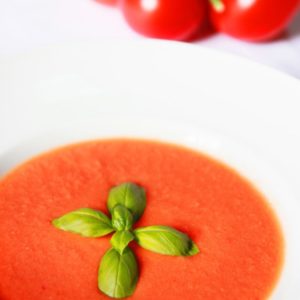
Tomato Gaspacho
Here is a recipe for gazpacho, that wonderful cold vegetable soup. There are mainly tomatoes. I propose a simple version, only composed of vegetables (except for the vinegar and olive oil). You have to make it a little ahead of time to let it cool enough in the refrigerator. Delicious on those hot summer days!
Ingrédients
- 1 kg tomatoes
- 1 cucumber
- 2 red peppers
- 2 cloves of garlic
- 1/2 white onion
- 5 cl sherry vinegar
- 10 cl olive oil
- salt
- pepper
- 1 tbsp. tomato paste (optional for more tomato flavor!)
Instructions
- Start by peeling the red peppers. With a good peeler, this is no problem!
- Remove the white part inside and get rid of the seeds.
- Peel the cucumber.
- Cut in half lengthwise and remove the middle part with a spoon.
- Peel the onion and cut it in half. I only use half an onion, because otherwise the gazpacho is too strong.
- Plunge 20 seconds in boiling water, the tomatoes that we will have taken care to incise on the top.
- Remove the skin.
- Also remove the part where the branch was. Then get rid of the seeds by pressing the tomatoes.
- Peel the garlic.
- Put all the vegetables in a blender.
- Add the vinegar, salt and pepper.
- Then add the olive oil.
- Put the blender on for at least one minute to reduce to a fine soup. You can add at this moment a tablespoon of double tomato paste (what I did!). This will reinforce the taste of the tomato. But this is not necessarily very traditional, but still very good!
- Chill at least 3 hours before eating!
Nutrition
Calories: 129kcalCarbohydrates: 24gProtéines: 5gFat: 3gLipides saturés: 0.5gGraisses polyinsaturées: 1gGraisses monoinsaturées: 2gSodium: 363mgPotassium: 965mgFibre: 6gSucre: 14gVitamine A: 862IUVitamine C: 60mgCalcium: 103mgFer: 4mg
Vous avez essayé cette recette ?Let us know how it was!
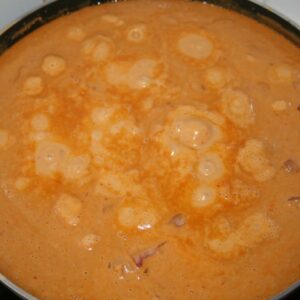
Massaman Curry
First real difficulty to take this curry in picture! Because when you see it, you can’t imagine how delicious it is! And yet! The “massaman” curry is a Thai curry of Indian origin. The result is a very mild curry, which will appeal to those who want a spicy but mild dish. It can be made with any kind of meat, beef, pork, duck. I propose here a recipe with chicken. The massaman curry is also composed of potatoes and peanuts. I give you the complete recipe of the curry paste to make yourself. The difference between a homemade curry and a ready-made paste is obvious, and the trouble you go through to make it is well worth it.
Ingrédients
For the curry paste:
- 2 dried Jalapeno peppers
- 1/4 teaspoon salt
- 2 tablespoons chopped lemongrass
- 1 teaspoon chopped galangal
- 1 coriander root
- 1 tablespoon of fried shallots
- 1 tablespoon of fried garlic
- 1 spoonful to coffee of cumin
- 1/2 teaspoon coriander seeds
- 1/2 spoonful to coffee cloves
- 3 spoon oil
For the curry:
- 250 g chicken thighs (skinless and boneless)
- 150 g potatoes
- 3 shallots
- 3 pods of cardamom
- 3 tablespoons of tamarind pulp
- 1 tablespoon of nuoc nam
- 3 dried bay leaves
- 1+1/2 tablespoons brown sugar
- a handful of unsalted roasted peanuts
- 750 ml coconut cream (for cooking)
- 250 ml coconut milk (for soups)
Instructions
- Start by soaking the red peppers in hot water for 30 minutes. Remove the tip and the seeds inside.
- Put them with salt, either in a small blender or in a mortar. Mash or blend (with salt) until pureed.
- This may take some time depending on the quality of the peppers.Bernard's advice:you can simplify the task and mix them first and then put them in mortar and continue the work by hand.
- Wash the coriander roots. On the picture there are 3 of them because I had to prepare a giant curry for a dinner party! But otherwise it is well one root for the recipe.Bernard's advice:Cilantro with the root can be found at Tang's or Asian grocery stores. You can cut the roots and freeze them to make other curries later.
- Add the coriander root and crush well with the pestle.
- Put the chopped lemongrass in a small frying pan. It is available in frozen packages already chopped. This is probably easier to use. Put it on low heat and let the lemongrass dry and toast slightly.
- Then add it to the mortar and crush well.
- Do the same with the chopped galangal. With a good knife it is possible!
- Then cinnamon and cumin and clove powder. Let it toast slightly. Always add to the mortar and mix well.
- Then add the fried garlic and shallot. They can be found in pots in Asian grocery stores.
- Toast the coriander seeds. To reduce them to powder, I removed the curry paste during preparation and crushed the seeds in the empty mortar, then added the paste.
- Continue to crush with a mortar to obtain a curry paste. If it is too hard to work with, put it in a blender for a while.
- Heat the oil in a wok. Add the curry paste and let it fry a little until it absorbs the fat. The dough is finished, it can be kept in a cool box for several days or weeks.
- If you decide to prepare the curry right away, then add the coconut cream (for cooking) and the coconut milk over low heat.
- Add the peeled and thinly sliced potatoes and the chicken cut into pieces. As always, I would advise against using too dry whites for this type of dish. It is advisable to take only the upper part of the thighs because they will be cooked for a long time and will remain tender.
- Add the tamarind pulp, the nuoc nam and the sugar.
- Unsalted roasted peanuts.
- Shallots cut into thin strips.
- Finally the crushed cardamom pods and dried bay leaves.
- Finally, let the curry cook until the potatoes are done. It takes about 20 minutes on low heat from the last ingredient added. Serve withsticky rice (click to get the recipe).
Nutrition
Portion: 5personsCalories: 463kcalCarbohydrates: 41gProtéines: 9gFat: 24gLipides saturés: 11gGraisses polyinsaturées: 4gGraisses monoinsaturées: 8gLipides trans: 0.1gCholéstérol: 26mgSodium: 324mgPotassium: 496mgFibre: 2gSucre: 28gVitamine A: 139IUVitamine C: 18mgCalcium: 55mgFer: 3mg
Vous avez essayé cette recette ?Let us know how it was!